
All of us have heard about composting. It SOUNDS like a great way to have a lower carbon footprint, to keep your scraps and your kitchen waste out of the landfill… but it’s intimidating. Learn this easy method of backyard composting that gives you finished compost in just 18 days!
Why I Love Composting
Reducing, reusing, recycling and lowering our carbon footprint is important!
Healthy soil=healthy plants that are more pest and disease resistant
Adding compost reduces my need to water my garden significantly (WHAT?!)
Science is FUN
I love being able to compost to create a healthier, more self-sufficient garden that grows better plants that feed my family and community at large.
But if you’ve tried and it hasn’t worked, or it’s only kind of working?
Decomposing vs. Rotting
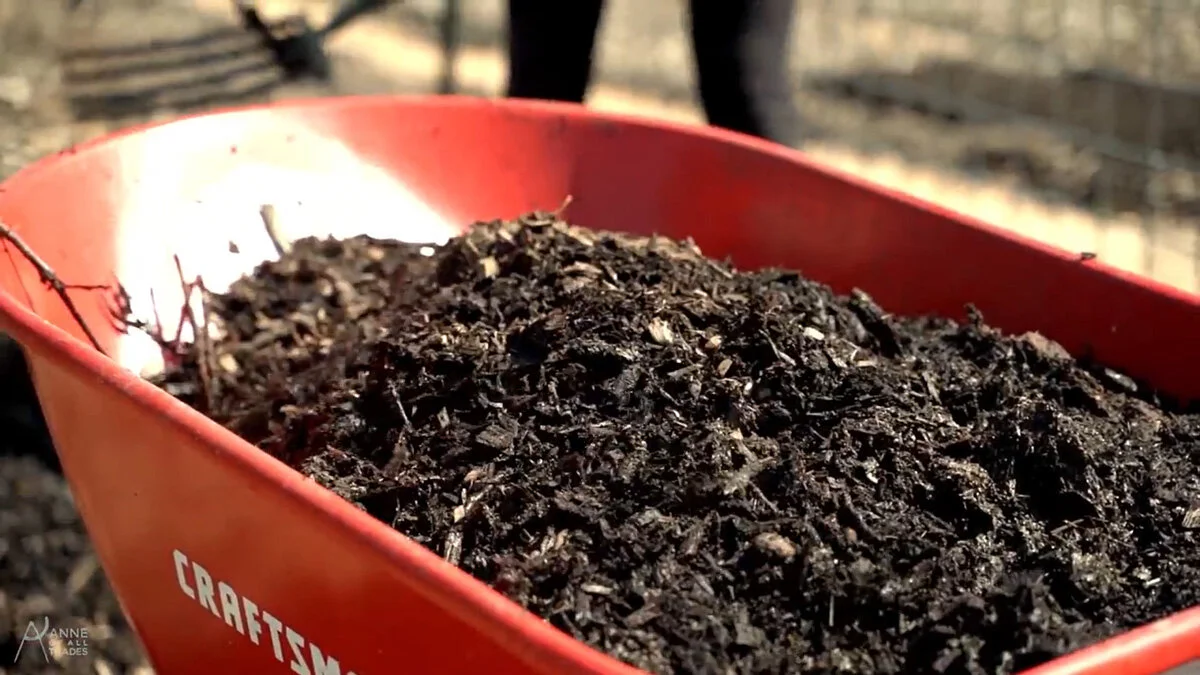
The composting, or decomposition process is what turns our kitchen scraps (and junk mail) into organic matter that has decayed to the point of becoming a natural fertilizer. Having the right combination of carbons (browns) and nitrogens (greens) in a moist environment with plenty of airflow (aerobic conditions) is what makes this possible.
Rotting, on the other hand, is the process putrefaction. It happens in an airless (anaerobic) environment. When there’s no browns to mix with the greens, when there’s too much moisture and not enough air, bacteria and fungi breed and grow and the resulting bad smells start to matriculate and attract flies, rodents and racoons to your backyard buffet.
What makes Compost “work”
A compost pile needs two things to create this natural fertilizer: carbon and nitrogen. We refer to carbons as “browns” and nitrogen as “greens”, just to make it simple! If we have the right combination of carbon, nitrogen, water and air, we’re going to experience some fun science-y stuff together.
The analogy of a Leaf
If I were to grab a leaf off of a tree and leave it out in the elements, it would wilt, wither and eventually dry out. Months, or even years later, if undisturbed, that brown leaf would remain in that same dry, brown state. In that brown state, the leaf isn’t of much use to us. But if we were to pull a green leaf from the tree and put it inside a small pile of brown leaves, the brown leaves would trap all of the nitrogen, acids and gasses that the leaf released as it started to wilt, wither and dry out. Once the green leaf inside the brown leaves had fully dried out, by stirring the pile, we would activate the same process that SHOULD be happening in our compost piles. The brown leaves act as sponges for the goodies the green leaf is giving off as it withers. As the interior leaf becomes smaller, less and less of the brown leaves can touch it. Stirring the pile gets everything touching again, exposes the inside of the sponges to the outside air which then allows them to wither and dry a little more, and each time the pile gets stirred, the pieces get closer and smaller, closer and smaller, until all of the leaves have eventually fully broken down.
In the same way, in our compost piles, we need to trap our greens inside a house made of carbons and then, as the greens break down and the carbons absorb their goodies, we need to keep moving and squishing things all together as they all get smaller and smaller.
What are good Carbons (browns)?
In the most simple terms, carbons are anything that has come from a dead tree: cardboard, paper, sawdust, woodchips, sticks, dry leaves, etc.
Because I stripped nearly all the leaves and branches off of the green stalks photographed above, these will act as browns eventually, but I find using something sturdy, such as branches, are a great way to build walls for your compost pile.
Remember, there is a little bit of wiggle room when building a compost pile, so don’t fret over making the “perfect” pile!
What are good Nitrogens (greens)?
Usually anything that grew in or on a plant, is or was recently alive, or was alive recently enough that it has some kind of natural moisture left in it can be considered a gree. Live/green leaves, fresh grass clippings from the yard, kitchen scraps, etc.
Even though it’s not always green in color, POOP is also considered a green material (but to keep things a little safer and less confusing, let’s say here that we’re only using the poop of animals that ONLY eat plants). My donkeys and alpacas are happy to provide these extra greens for my compost pile, and the fact that they’re pre-digested makes them compost even quicker 🙂
How to Build a Simple Compost HOUSE
The first step in building a house is putting in a floor (or foundation). Our floor is made of Carbon (browns). I like to use torn up cardboard, junk mail, wood chips and shavings from my woodshop, for my carbons in my compost because I’ve got tons of all of those here. You want to make this first layer about one fist deep (or 3-4 inches).
PRO TIP: Using a pitchfork is the easiest way I’ve found to move a lot of wood chips quickly!
From here we will build up some carbon “walls” on our pile. Keeping our carbon materials on the outside will help trap bad odors from decomposing materials inside the pile. Doing this right will keep smells down pests away from our piles, but it will also make our pile “work” the way it needs to.
To do this, simply place any brown materials layered up along the outside edge of the pile, about 4-6 inches deep for now.
Next, we need one fist (3-4”) of greens inside our walls. We want to cluster our greens (or nitrogen) In the center of our compost piles, or, using our house analogy, our greens are our “furniture.” Because we want to make sure there’s lots of airflow in our pile though, it’s important to break our greens up so they’re not squished so tightly together that they accidentally create an airless (anaerobic) environment and just rot instead of decomposing. A lot of leaves have a waxy coating on them that is actually waterproof on one side, so we want to make sure we’re not trapping any air or moisture in between large swaths of greens. I break up my greens with a shovel or a machete as I add them into the pile.
On top of the green layer, sprinkle a handful of dirt. Your garden soil is full of billions of microorganisms. It’s these microorganisms that will be activated by the moisture in the pile and will help to start breaking the pile down. Call it giving your compost pile a jumpstart!
PRO TIP: I recommend using soil from your garden, if possible because it’s already teeming with the bacteria your garden will need.
Water down your greens. At this point, I like to add some water to my greens. Moisture is what activates the microorganisms and bacteria that need to get busy breaking everything down, so adding water at this point speeds up the process. If you’re using really wet “greens” like tomatoes, watermelon skins, etc, this isn’t as necessary because those things already have a high water content, but I was using a lot of “drier” greens, so watering the pile kickstarted the decomposition process.
It’s now time to trap all that green material and build a “roof” to our compost pile. I did this by adding some paper scraps, dried leaves, and then a nice top dressing of my decomposing wood chips. Your roof should be two fists deep, or about 6-8 inches.
If you’ve used up all the materials you’d like to compost, you’re done for now! If you’d like to turn your house into a condominium, start adding brown walls, green furniture, and brown rooves until your pile is about 3 feet tall. I would recommend stopping at 3 feet tall (deep) to keep your pile from toppling over.
Your pile should be noticeably active within 3 days. You’ll know it is “working” because it will be warm to the touch. If you notice your pile warming up, then a few days or weeks later cooling down, eventually cooling to the point that the pile is cool to the touch, you’ll know it’s time to turn the compost pile.
When to Turn the Pile
The decomposition process generates heat. Done right, it can generate quite a lot of heat. As the material in your pile starts to break down and the things you put in it start to get smaller, the space between each thing in the pile gets larger.
Too much space, too much airflow, and all of a sudden, all that heat escapes. So to re-activate that heat generation, we need to make everything touch each other again.
The temperature dropping is our sign that the decomposition process is slowing down and it’s time to turn the pile, get everyone inside the house touching again, and therefore restart the decomposition process.
If we want our pile to break down fast, we want to be careful how we do this, basically flipping the entire pile inside out bringing the interior of the pile to the exterior, and the exterior of the pile to the interior. But really, the simple process of taking a pitchfork and flipping the pile over, top to bottom, in the spot next to the pile, will do nearly the same thing, so you really don’t have to get too precious about the process. I use a pitchfork to flip the whole pile the same way I built it.
Within two days, the newly flipped pile should heat back up, and then I’ll flip it again when it starts to cool a few days or weeks after that. Depending on the size and contents of your pile, 2-3 flips could be all you need to do, but a better way to evaluate when your compost is finished is to look at it closely.
How Fast Will I Have Usable Compost?
By following this method, you can actually have usable compost in as little as 18 days! This will require regular turning of the pile every 3-4 days.
You don’t have to turn your pile that often, but the more closely you can monitor the temperature changes of your pile and manage it accordingly, the quicker you’ll have natural fertilizer ready for the garden.


Leave a Reply