
In today’s article, we’ll go over some small bathroom ideas that will hopefully help out with your small bathroom remodel! We’ll do an overview of the remodel process and I’ll share information about the products used to help create this space. ! I hope you get a few small bathroom ideas and small bathroom inspiration in this article!
Please note, affiliate links are used in this article. If you do purchase a product on Amazon or elsewhere and first click on one of the links, we will get a small commission which will help support more projects to be shown on our website. Thank you for your support!
Britt and I purchased a fixer upper home out in the foothills of the rocky mountains. We absolutely love the property, but the 1979 split level home that came on it has been some work.
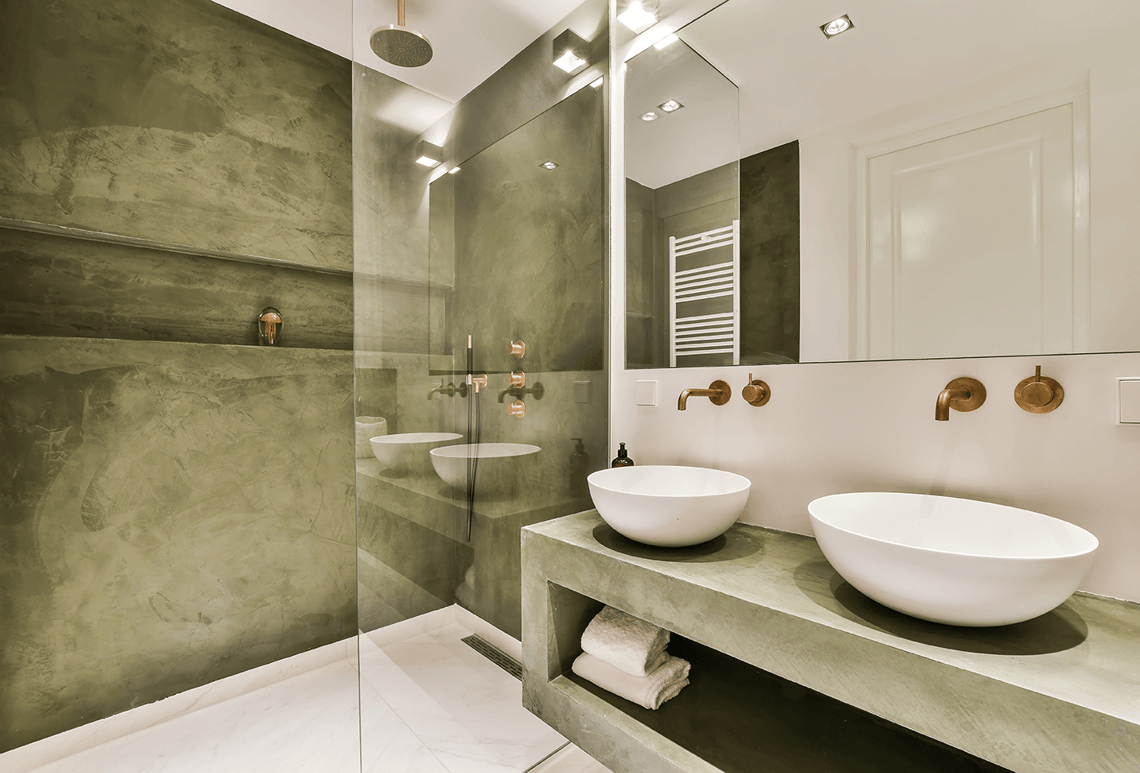
Small Master Bathroom Ideas
The master bedroom originally had a very dated bathroom connected to it. To say it nicely, there was a lot of room for improvement. Since we had a small space to begin with, we knew it would need to be as efficient as possible for both of our needs.
We brainstormed some of the special features we wanted for the bathroom and what would make it feel luxurious. The top small bathroom ideas on our list for making it luxurious were the following.
Shower Speaker – ( Polk in ceiling stereo speaker )
– Connected to an Echo Dot so you can use voice control
Small Amp to power speaker – ( Amp )
Heated Flooring – Heat Cable and Thermostat Kit , Ditra Heat Mat
– I used 240V, but there are 120V options
Luxury Rain Shower – Large shower head and handheld wand
Pipe and Wood Shelves
Glass shower door for small spaces
Large 24×36 mirror
Bathroom vanity light fixture
Other big purchases for this project
Schluter Shower Pan Kit – Can be cut down to any size
Pre-made Shower Niche
Woodford B0500 Compact toilet – Great for small bathrooms
4×12 White Subway Tile ( Purchased at my local Lowes )
6×24 French Gray Wood Grain Floor Tile ( Purchased at my local Lowes )
Delfino Stone Arctic Topax 12″ x 12″ pebble tile
Exhaust Fan
Small bathroom demolition
I started the project my taking out the old light blue fiberglass shower. I used a reciprocating saw for this process. We rented a dumpster from our local garbage company to get rid of old drywall, shower wall, flooring, and the vanity.
Converting to pex piping
We converted the old copper piping to pex pipe. To convert the pipe, we used Pex Sharkbite fittings.
Moving the drain
I had to move the shower drain a few inches to center it in the shower. The overall shower area is about 34 inches by 34 inches after the tile has been added.
Wall board
We attached cement board to the studs. Many people are now doing green board ( green drywall that is mold proof ). They will then coat it with a product like Redgard. Or, you could cover it with a Schluter membrane.
We used cement board and were planning to roll RedGard over it. However, our shower pan kit came with the Schluter membrane, so we ended up using that instead. If I did this over again, I think I’d prefer to use the green drywall since it is easier to work with.
Shower pan and curb
I originally planned to build the shower pan using mortar. This is a couple day process from start to finish, and is an art. If you are an average DIY’er, you can save yourself a headache and tons of time by getting a kit. Simply order a Schluter shower kit. Yes, they are an investment, but it is an investment that will protect your shower from leaking and it is easy to install. You would most likely pay a plumber this much or more just to install a mortar pan.
For about $350, this kit was well worth it for me. Simply cut the foam curb and pan to size. It is pre-sloped and ready to go! I would highly recommend using the Schluter shower kit as one of my top small bathroom ideas for your renovation.
Wiring the small bathroom
The original bathroom had 1 light, no exhaust fan, and 2 plugins that needed moving. I originally had a 240v baseboard heating unit to heat the small space. As for wiring, if you have experience and are comfortable with wiring, then it is something that can be done by a DIY’er. But if you do not have experience, simply hire an electrician. Before doing any wiring, always turn off the circuits at your breaker panel.
I added a new 4 gang box so we could add some new lights. One switch is for the new bathroom vanity light, one is for the 4 inch LED can light in the shower, one is for the bathroom fan, and the last is for the bathroom fan light. There are two GFCI outlets in the room. The metal box is for the 240v wire coming into the room for the heat. The heating element source is then run through the conduit to the floor.
Small bathroom vanity idea
Our bathroom vanity’s width could be a maximum of 36 inches which is a pretty common size. However, the depth of the vanity could only be about 18-19 inches. This really limits you! While I plan to build a custom vanity at some point, we just wanted to buy a vanity so we’d have one. We found a vanity at Home Depot that was pretty affordable! It came with the sink, but we purchased a faucet separately. It isn’t real heavy duty, but works fine.
Drywall
I used drywall to cover the wall back up. I taped and mudded the seams. After that, I used a 12 inch pool trowel to give the wall texture. I like the look of this, plus it helps hide imperfections if you are more of a novice in drywalling.
Paint
Once the texturing was finished, Britt and I painted the walls and ceiling. We used a semi-gloss white ceiling paint to protect the ceiling. For the walls, we used a white satin paint from Sherwin Williams named Alabaster. However, we ended up painting it a different color later since we needed some more contrast.
Window
As for the window, this is an aluminum clad wooden window I got from Jeldwen. It is a single panel window, with wood on the inside. We put this Jeldwen Siteline window in earlier in the remodel while we were doing the siding for the home. The window provides great ventilation in the warmer months, and excellent lighting all year round.
Shower speaker and light
We put a wet rated 4″ LED can light in the shower. We love having extra light, and it is something we will be adding in the remaining 2 bathrooms of the home. The shower speaker is another one of our favorite small bathroom ideas. This is a 6.5″ Polk Stereo Speaker that sounds absolutely great. It has both a right and left channel in one speaker. You will need to run two in-wall wires through the wall to your amp. So there will be 2 red wires and 2 black wires total.
Waterproofing
The Schluter kit I ordered came with a wall membrane, so I used thinset to adhere this to the wall. Many people will use RedGard or a similar product instead of a Schluter-Kerdi membrane. I feel like rolling on RedGard would be a little easier for a DIY’er.
Floor heat
I installed floor heat for the bathroom using a Ditra heat uncoupling membrane and electric radiant floor heating by Warming Systems. There are cable versions for both 120v and 240v systems, so first determine what you have wired to the bathroom area. I called the Warming Systems company to ask if I could pair their cable with the Ditra membrane, and they ensured me I could. The cable is available in various lengths, and can’t be cut.
Unfortunately, I ordered more square feet than needed, but Warming systems told me how I could configure the cable a little closer together than recommended in the instructions. They also said it can be run into the shower, and so I did this. I wasn’t planning to do a heated shower floor, but it’s kind of nice and works great. Heat should not go under the toilet or vanity area. The Warming Systems heating cable is much cheaper than the Schluter cable, and still had great reviews.
Tiling
I used a 6 inch by 24 inch wood grain tile from lowes named French Gray. It has nice variation and mostly grays, but does have some brown hues. It can pull off a modern or rustic look in my opinion. The heat cable was embedded in thinset prior to being tiled over. If not using Schluter brand thinset, to the best of my knowledge the company recommends using an unmodified thinset mortar to apply most of their system.
Bathroom floor tile spacing
I used 3/16 inch spacers for the tile and pewter colored sanded grout. Levelers were used to help level each tile. They worked alright and did the job, but for future tiling jobs I will be using Spin Doctor levelers.

Leave a Reply